
 It’s been a few months since I last raved about my love of Scrivener so I thought I’d update you on whether my love had waxed or waned. In summary, I began writing my new book with Scrivener on March 18 this year. I have now essentially finished it. I have written 80,000 words in just over 5 months (see the lovely Scrivener Project target pic on the left). This has never happened before. I am on a creative high.
How much of this can I put down to Scrivener? It’s hard to say. I think it’s been a huge help. Also this book has been fun to write, which makes the words flow too. I’ve now moved on to editing my book in Scrivener, which is what I wanted to talk about today, because I think Scrivener has several features which make editing easier than in Word.
 The Beauty of the Binder
The first of these features is the Binder, which you can see in the photo on the right. The Binder is Scrivener’s way of organising scenes. Each folder (the green and purple icons) represents a chapter. Within each chapter, there are scenes. I have told Scrivener to colour all the chapters in Part 1 of my book in green. I have told it to colour all the chapters in Part 2 of my book in purple. This allows me to see, at a glance, how long each section of my book is. Being a work of historical fiction, I want to use Part 1 to set up the current situation my character is trying to escape from, to show some of the things she has to overcome in order to escape and why she wants to escape. I don’t want this part to be overlong and bore the reader before my character has a chance to run away. I don’t want it to be too short so that the reader doesn’t appreciate the huge challenge my character has set herself. Being able to view, in the Binder, how many chapters and scenes I have in each part is a quick and easy way to see whether I think any part of the book might be too long or too short, and whether any chapter might have too many scenes or not enough scenes.
If I decide I want to delete a scene, I simply pick up the coloured icon next to the scene description in the Binder and drop the whole thing in the trash, which is at the bottom of the Binder. If I want to reinstate that scene at a later date, I just pick it straight up out of the Trash and slot it back into the Binder. If I want to move a scene to a different spot in the Binder, once again, I just pick it up and move it. Then I scan through the Binder, or look at the chapter in in the cork-board and see if I like the new location for the scene. I can be much more reckless with deleting and moving scenes in Scrivener when I edit because it’s so easy to make changes, and it’s so easy to reinstate things back to how they were if I don’t like the change.
You’ll see in the Binder picture above that most scenes are coloured blue, some are coloured pink and some yellow. Again, Scrivener allows you to assign colours to scenes and chapters based on descriptions that mean something to you. Blue, for me, is a completed draft of a scene. Pink means I need to go back and add some extra information into the scene. Yellow is an idea for a scene that I haven’t written yet. Once again, I love this system. It is so easy to see which scenes and chapters are complete, and which ones I need to return to in the edit to work on further.

Scrivener Notes
You can see in the picture on the left the entire Scrivener screen. The Binder is on the left. The main writing area is in the middle. On the bottom right is a yellow section. This is the Notes section. Each scene has this section for you to make notes about that scene. So, when I am writing, if I have an idea for something that needs to go into the scene, but I just can’t write it yet because I need to do some more research, it means I don’t have to stop and do the research. I just make a note in the Notes section to tell me what it is that needs to go in later and I finish the scene as best I can and I move on to the next. I never have to stop because I can’t finish a scene. I think this is one of the biggest reasons why I have written so fast. Scrivener makes it so easy to keep moving forward. I don’t have messy notes in the middle of the scene. The notes have their own tidy section. Then, when I am editing, I just scan my eyes down the Binder, find all the pink scenes, check the notes I have made for each of these, go and do the research I need to do and then I write the scene.
 Managing the Trajectory of Sub-plots
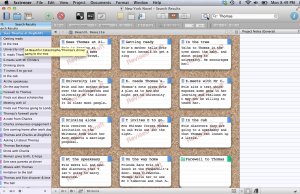
Another way to manage the story trajectory when I’m editing is to view all the scenes that relate to a particular sub-plot, or all the scenes which feature the main character’s love interest. For instance, I can use the search field to ask Scrivener to find every scene with the word “Thomas” in it. Thomas is one of the potential love interests. The picture on the right shows the cork-board, and on this cork-board are my search results—all the scenes with “Thomas” in them. I can scan through this cork-board and check the trajectory of the love story part of the plot to make sure it has enough ups and downs, the right pace, and that everything is in the right order. If it isn’t, I just pick up one of the cards on the board and move it to a different spot and the whole scene attached to the card moves too. Brilliant!
So, based on five months of using Scrivener for writing, and having begun to edit my novel now, I can only say that Scrivener gets better and better. What do you think? Do you like the sound of any of these features? If you’ve used Scrivener, how does it help you to edit your book?


Natasha, what happens when you’ve finished the final draft of your manuscript and have to deliver it to a publisher? Can you export it from Scrivener into a Word document?
Hi Amanda, yes you can. In fact I had started a few chapters of the book in Word and used the Import feature to import what I had done into Scrivener originally. It was very quick and easy and I’ve been led to believe that the reverse function, the export back into Word, is just as quick and easy. I’ll let you know in a few months when I get around to that part of it. That might be my next Scrivener blog post!
Oh, good. I look forward to hearing more about your Scrivener journey.
I love Scrivener — I don’t have anything bad to say about it. I’d love a ‘Find-Replace’ like there is in Word, but apart from that, I can’t think of anything else. And it’s cheap. I love being able to see everything at a glance. I love how you can split the screen — to compare versions, or to use a photo as inspiration. I must say, I don’t use all of its whizz-bang goodies, and I probably should do the tutorial again to remind myself of what I’m not using but could benefit from. For example, I didn’t realise I could set a word target until I read your blog!
By the way, congrats on reaching 80,000 words in five months — great effort. Scrivener may have helped, but you’ve still typed the words …
I hadn’t yet realised that there wasn’t a Find/Replace option – you’re right, that is handy when you need it, hopefully I don’t find an occasion to have to use it in this book. I’ll just have to keep everyone’s names unchanged! The word target is excellent, one of my favourite features. For some reason I find it incredibly motivating to have that tick along as I write. And thanks for the congrats, I’m pretty pleased – hopefully I’ve written 80,000 good words, not 80,000 pieces of rubbish!
Scrivener definitely has a find/replace option, at least in the Windows version – I use it all the time! From the main Edit menu, select Find and then Find again. The box that opens there gives the option not only to find but also to find and replace. If you want a global project find and replace, go to Edit -> Find -> Project Replace.
I adore Scrivener and have project files for not only each of my novels but also for my non-fiction books, my magazine work (super handy for organizing my submitted work plus works-in-progress, interviews, correspondence, etc.), my website/blogs, even my career plan and my daily To Do lists. I even used Scrivener to plan our recent move from Europe back to the US. I recommend it so often that I should just start wearing a sign around my neck that says, “Hey, have you tried Scrivener yet?”
Fabulous post – have fun finding and replacing!
Thanks for that, it’s one of the things I love about blogging, there are so many people out there who know the answer to any question. I hadn’t thought about using Scrivener for anything other than novels so you’ve inspired me to use it more widely for other kinds of writing. Thanks so much for visiting and commenting.
Hi Natasha, I read this blog post yesterday and didn’t comment because I feel inept that I have Scrivener but don’t know how to use it properly. So today I signed up for an ASA day course being held in October in Melbourne. I feel good that I will learn it in a ‘supported atmosphere’ – but I still have to do homework, ie do the tutorial first which I think you said in your other post is a good idea to do. Anyway, long-winded way of saying: I’m on to it. People swear by it.
Hi Jenny – how fantastic that the ASA does a course in Scrivener. I’ve never seen a course offered in it over here in Perth. I think a course would be a great way to make sure you get the most out of it – I’m pretty sure there are many features that I’m not using because I’ve forgotten about them from the tutorial, or that maybe weren’t covered in the tutorial. Have fun with it – I hope you enjoy using it.
Pingback: How to Use Scrivener to Edit Your Book | Everything Scrivener
There’s a Find and Replace option in Scrivener. It’s called “Project Replace”, and it’s found under the Edit > Find > Project Replace. You can also choose whether to replace text just in the Text or also in notes and titles as well.
Also: excellent point about being able to manage the trajectory of sub-plots.
Thanks for that information. I’ve just looked but I don’t have that option — maybe I have an older version of Scrivener. I will contact them as I may need to update. It is an invaluable tool … Thanks again.
Oh no! Hopefully you can get it in an update. I’m on a Mac version, are you on Mac or Windows? Wonder if it’s different in the different systems?
Thanks for pointing that out, great tip. And yes, managing the ups and downs of subplots is almost one of my favourite features. Impossible in Word, simple in Scrivener. Thanks for stopping by, and for your comment.
Thanks for this Natasha! I use Scrivener for Linux, which is the same as the Windows version, I believe. Brilliant software. But I think I over-use keywords. I have a massive tree of them. I mainly use them to track loose ends. For any loose end that needs to be addressed later, I tag the scene with a keyword identifying the loose end. When I tie up the loose end I tag that scene as well. When the whole novel is complete I should find all the loose end keywords in pairs. Any lone loose end keywords indicate something’s been left hanging. I’m sure there’s a better way. 🙂
As for find and replace: CTRL-F
Hi Richard, I haven’t really used the key words feature a lot yet. If I have loose ends in a scene, I just give it a special colour – pink – to signify that it is a scene I have to go back to and add information to, or to change something about, or to fix in some way. And thanks for the find and replace tip – I love that this blog has given me lots of new info about Scrivener.
Yes, that could work, too. I use colours differently. At the moment I use colours to indicate the POV character for 3rd person omni. I could also use the internal scrivener links in the notes to join the loose ends. And just stick the word LOOSE-END in the note for those that still need to be addressed. There’s an idea! 🙂 So many ways to do things in Scrivener. It’s great.
Natasha, this is so helpful. I have Scrivener but have barely mastered the tip of the iceberg – and I use the word ‘mastered’ loosely. This may be a dumb question, but do you actually type your WIP in Scrivener? Or do you import it from Word? So glad I found your blog, and I look forward to reading your novels! Thanks!!
Hi Ferris, I’m glad you found it useful. I type straight into Scrivener so each scene is set up there from the outset. You can import from Word; when I started using Scrivener, I had already written 7000 words in Word, so I just imported those in and then continued in Scrivener. Thanks for visiting my blog, and for commenting! Good luck with Scrivener.
Firstly, congratulations on finishing a first draft so quickly – that’s amazing. Secondly, thanks for all these great tips, especially managing sub-plots – brilliant. I definitely need to revisit the tutorial as I know I’m only using a fraction of the program’s capability. There’s a Scrivener for Dummies book too.
Thanks Annabel. And I’m sure I’m still only using half of the features of Scrivener too. I had heard there was a Scrivener for Dummies – have you read it? Is it any good?
I haven’t read it but I heard it positively reviewed on the Self-publishing podcast
Great tips. I started using Scrivener a few months ago after reading one of your blog posts about it, and I too have found I’m writing much faster. I’m getting close to finishing my current manuscript already, and I was only about a third of the way through when I made the switch! I love the word targets but haven’t used many of the other options yet. I’m almost looking forward to the editing process now, where I usually dread it!
Hi Rebecca and congratulations on being nearly finished with your draft. Good luck with the editing, I hope you find some of this useful when you begin!
Pingback: My Writer’s Toolkit | A.K. Anderson | Science Fiction and Fantasy Author
Pingback: Can You Really Teach An Old Dog New Tricks? | The View Outside
Pingback: My Chapter and Ideas: Editing | Firefly's Journal
Pingback: Scrivener Template v2.0 is here! | Caroline Norrington
Pingback: My Chapter 3 and Ideas | Firefly's Journal
Pingback: Book Bloopers… A Guest Post By S.K. Nicholls | The Literary Syndicate
This looks very helpful and I like the progress bar!
The progress bar is one of my favourite tools.
I am writing a saga. And am coming up on two years of writing . I could never kept my stories strait without Scrivener. I do a lot of editing on the fly, so thanks for even more ideas on how to use S to edit. I use timeline and scaple too.
I haven’t used Scapple – it looks interesting. Would love to know how others use it.
Rather than put scenes in Trash, I like to add two folders: Unused Scenes and Deleted Scenes. I also add a Work Log, where I enter daily total word counts and keep a running tally of brief thoughts on the day’s highlights, or lowlights, as the case may be.
The unused and deleted scenes folders are a great idea
Unused scenes and deleted scenes is a great idea, thanks! I’m definitely going to borrow that idea.
Another highlight of Scrivener is the ability to add keywords to scenes. Keywords are a powerful function that permits a writer to check the flow of a particular character, location and/or other ideas in his or her work. Here’s a link to a Scrivener user’s blog that describes doing just that:
http://www.pigfender.com/index.php/2013/03/tracking-characters-with-scrivener-keywords/
I haven’t used keywords yet, but you’ve tempted me to try. I will check out the link, thanks.
I have been curious about this program for a while. I have to record notes and summaries and manipulate scenes on paper at the moment and I am having trouble keeping 2 books straight. This looks like a great solution to my challenges. Thanks for the review!
Scrivener is fantastic for doing just what you’ve said. Good luck with it!
Reblogged this on and commented:
As a newbie to Scrivener, and as someone who (with any luck) will have a new book to edit post-NaNo, I found this interesting enough to share.
Thanks Courtney, and good luck!
Just came across your site. I finished my NaNoWriMo goal last week and while I am still writing, I have my eye toward the upcoming editing process. I’m still very new to Scrivener and love writing there instead of Word. I have done the tutorial but it’s so hard to let this kind of information sink in unless I’m using it. Your post really helped get to the point of some of these functions I’ve seen, but didn’t quite remember how to use. Thanks a bunch and congrats on finishing your manuscript.
Pingback: Writers Ask Writers: What Tools Do You Need to Help You Write? | While the kids are sleeping
Pingback: No Wasted Ink Writer’s Links | No Wasted Ink
Pingback: “Pantsing” vs Plotting and Other Useful Literary Terms | While the kids are sleeping
Pingback: Why You Should Use Scapple for Brainstorming Your Book | While the kids are sleeping
Pingback: The 10 Things I Must Have Before I Start Writing a New Book | While the kids are sleeping
Just came across your blog via Pinterest. What a happy find! I’ve been using Scrivener for about two years and cannot wax enthusiastic enough about it. I hope whoever commented above about wishing there was a Find and Replace function finally did find it 🙂 I’ve changed characters’ names and points-of-view and even tenses, thanks to Find and Replace.
One of my favorite functions is the scene capture or “Snapshot” function. On Mac it’s Shift-Command-5. This takes a snapshot of the scene I’m working on (it even makes a camera snapshot sound), allowing me to make changes without losing anything I’ve done before. There are scenes for which I have eight different versions, all saved thanks to the Snapshot function. I can compare older versions with the current one.
The outline is another favorite. You can create your own categories and craft as detailed or as simple an outline as you wish, depending upon which categories you select/create and use. Just brilliant.
Anyhow, happy writing and I look forward to exploring your blog!
Hi Julie, thanks for dropping in, I’m glad Pinterest brought you here! I haven’t used the Snapshot function yet so thanks for highlighting that. And yes, the outline function is great; so much in one brilliant package. I hope you enjoy the blog.
Pingback: Natasha Lester: while the kids are sleeping | Writers Ask Writers: What Tools Do You Need to Help You Write?